Thursday, May 27, 2021

How to Add Auto-Updating Text to Your Live Video Stream


If you’re streaming, you might want certain things to update live, as you broadcast. This could be a subscriber count or a donation amount, for example, where the content would refresh either live or at selected intervals.

An increasing count can encourage others to either subscribe or donate, or if an audience see others commenting, it might in turn embolden them to also comment. This is why dynamic text can be a really useful feature – let’s look at a couple of ways you can add dynamic text to your stream in OBS.

1. Updatable Text Files via a Widget (Streamlabs OBS)

One way to add dynamic text to your stream is to incorporate updateable text files, and the most popular method to do this through OBS is with a third-party service called Streamlabs.

Streamlabs has many useful features for streaming, but it's Stream Labels which let you add scrolling text or updating notifications to your stream. To use it, you install the Streamlabs software (a customized version of OBS) head to Sources and choose Stream Labels. You'll then be able to choose which type of label you'd like, how it looks, and where it will appear on the screen.

Combine Labels With an Ovelay Graphic from Placeit

If you're using Stream Labels, you can use a pre-made, customised graphic to place your labels and make everything look more interesting and on-brand. Sites such as Placeit let you choose a template and customise it right on the website, which is quick and easy.

overlay frame from placeit
Twitch Overlay via PlaceIt

If we take the overlay frame above as an example, you can see the pre-made spots for what would be dynamic text: top donations and recent subscribers. You can place the dynamic text labels you created in the steps above, and fit them with the placing, font, and colour scheme of the frame (or vice versa, change the frame to fit the labels—whichever works best) and they won't look like separate entities at all, but the dynamic labels will change and update.

2. Through a Browser Source

There are a lot of great people who, in looking for a solution to their own needs, create resources that everyone can use. If you think of something you’d like to do, chances are someone has thought about that too and made something that you can utilise.

Advertisement

Streamcounter

Sites like Streamcounter let you add your streaming account ID and make some basic choices as to how your counter will look

Streamcounter

You can then add your generated URL into OBS by hitting the plus on sources, and adding a Browser Source.

add browser as source

Paste in your generated URL from Streamcounter and make any changes you need to. 

add url

When you hit okay you’ll see your counter added as a source.

Livecounts

Another alternative is LiveCounts. When you open Livecounts you’ll see it’s very simple. Just click below the text and a pop up box will appear to ask for your channel name or ID/URL.

livecounts

In OBS, add a browser source by hitting the plus button in Sources, and paste the URL as before when prompted.

livecounter in obs

It looks a little messy, but you can tidy it up. Right-click on the source on the screen and select Filters. Then, under Effect Filters click the plus sign and add Crop/Pad.

crop and pad filter

You’ll see coordinate options for cropping – adjust those until only the counter is showing.

after crop

Next, right click and select Filters again and this time choose Chroma Key and choose to select the screen colour, then colour drop the counter background.

You’ll then have just the counter number visible and you can move it where you like. Here’s an example with the counter over a window capture of a browser

There’s a good video walk-through of this technique here, if you'd like more detail:


Video Streaming with Flask

 I'm sure by now you know that I have released a book and a couple of videos on Flask in cooperation with O'Reilly Media. While the coverage of the Flask framework in these is fairly complete, there are a small number of features that for one reason or another did not get mentioned much, so I thought it would be a good idea to write articles about them here.

This article is dedicated to streaming, an interesting feature that gives Flask applications the ability to provide large responses efficiently partitioned in small chunks, potentially over a long period of time. To illustrate the topic I'm going to show you how to build a live video streaming server!

NOTE: there is now a follow-up to this article, Flask Video Streaming Revisited, in which I describe some improvements to the streaming server introduced here.

What is Streaming?

Streaming is a technique in which the server provides the response to a request in chunks. I can think of a couple of reasons why this might be useful:

  • Very large responses. Having to assemble a response in memory only to return it to the client can be inefficient for very large responses. An alternative would be to write the response to disk and then return the file with flask.send_file(), but that adds I/O to the mix. Providing the response in small portions is a much better solution, assuming the data can be generated in chunks.
  • Real time data. For some applications a request may need to return data that comes from a real time source. A pretty good example of this is a real time video or audio feed. A lot of security cameras use this technique to stream video to web browsers.

Implementing Streaming With Flask

Flask provides native support for streaming responses through the use of generator functions. A generator is a special function that can be interrupted and resumed. Consider the following function:

def gen():
    yield 1
    yield 2
    yield 3

This is a function that runs in three steps, each returning a value. Describing how generator functions are implemented is outside the scope of this article, but if you are a bit curious the following shell session will give you an idea of how generators are used:

>>> x = gen()
>>> x
<generator object gen at 0x7f06f3059c30>
>>> next(x)
1
>>> next(x)
2
>>> next(x)
3
>>> next(x)
Traceback (most recent call last):
  File "<stdin>", line 1, in <module>
StopIteration

You can see in this simple example that a generator function can return multiple results in sequence. Flask uses this characteristic of generator functions to implement streaming.

The example below shows how using streaming it is possible to generate a large data table, without having to assemble the entire table in memory:

from flask import Response, render_template
from app.models import Stock

def generate_stock_table():
    yield render_template('stock_header.html')
    for stock in Stock.query.all():
        yield render_template('stock_row.html', stock=stock)
    yield render_template('stock_footer.html')

@app.route('/stock-table')
def stock_table():
    return Response(generate_stock_table())

In this example you can see how Flask works with generator functions. A route that returns a streamed response needs to return a Response object that is initialized with the generator function. Flask then takes care of invoking the generator and sending all the partial results as chunks to the client.

For this particular example if you assume Stock.query.all() returns the result of a database query as an iterable, then you can generate a potentially large table one row at a time, so regardless of the number of elements in the query the memory consumption in the Python process will not grow larger and larger due to having to assemble a large response string.

Multipart Responses

The table example above generates a traditional page in small portions, with all the parts concatenated into the final document. This is a good example of how to generate large responses, but something a little bit more exciting is to work with real time data.

An interesting use of streaming is to have each chunk replace the previous one in the page, as this enables streams to "play" or animate in the browser window. With this technique you can have each chunk in the stream be an image, and that gives you a cool video feed that runs in the browser!

The secret to implement in-place updates is to use a multipart response. Multipart responses consist of a header that includes one of the multipart content types, followed by the parts, separated by a boundary marker and each having its own part specific content type.

There are several multipart content types for different needs. For the purpose of having a stream where each part replaces the previous part the multipart/x-mixed-replace content type must be used. To help you get an idea of how this looks, here is the structure of a multipart video stream:

HTTP/1.1 200 OK
Content-Type: multipart/x-mixed-replace; boundary=frame

--frame
Content-Type: image/jpeg

<jpeg data here>
--frame
Content-Type: image/jpeg

<jpeg data here>
...

As you see above, the structure is pretty simple. The main Content-Type header is set to multipart/x-mixed-replace and a boundary string is defined. Then each part is included, prefixed by two dashes and the part boundary string in their own line. The parts have their own Content-Type header, and each part can optionally include a Content-Length header with the length in bytes of the part payload, but at least for images browsers are able to deal with the stream without the length.

Building a Live Video Streaming Server

There's been enough theory in this article, now it is time to build a complete application that streams live video to web browsers.

There are many ways to stream video to browsers, and each method has its benefits and disadvantages. The method that works well with the streaming feature of Flask is to stream a sequence of independent JPEG pictures. This is called Motion JPEG, and is used by many IP security cameras. This method has low latency, but quality is not the best, since JPEG compression is not very efficient for motion video.

Below you can see a surprisingly simple, yet complete web application that can serve a Motion JPEG stream:

#!/usr/bin/env python
from flask import Flask, render_template, Response
from camera import Camera

app = Flask(__name__)

@app.route('/')
def index():
    return render_template('index.html')

def gen(camera):
    while True:
        frame = camera.get_frame()
        yield (b'--frame\r\n'
               b'Content-Type: image/jpeg\r\n\r\n' + frame + b'\r\n')

@app.route('/video_feed')
def video_feed():
    return Response(gen(Camera()),
                    mimetype='multipart/x-mixed-replace; boundary=frame')

if __name__ == '__main__':
    app.run(host='0.0.0.0', debug=True)

This application imports a Camera class that is in charge of providing the sequence of frames. Putting the camera control portion in a separate module is a good idea in this case, this way the web application remains clean, simple and generic.

The application has two routes. The / route serves the main page, which is defined in the index.html template. Below you can see the contents of this template file:

<html>
  <head>
    <title>Video Streaming Demonstration</title>
  </head>
  <body>
    <h1>Video Streaming Demonstration</h1>
    <img src="{{ url_for('video_feed') }}">
  </body>
</html>

This is a simple HTML page with just a heading and an image tag. Note that the image tag's src attribute points to the second route of this application, and this is where the magic happens.

The /video_feed route returns the streaming response. Because this stream returns the images that are to be displayed in the web page, the URL to this route is in the src attribute of the image tag. The browser will automatically keep the image element updated by displaying the stream of JPEG images in it, since multipart responses are supported in most/all browsers (let me know if you find a browser that doesn't like this).

The generator function used in the /video_feed route is called gen(), and takes as an argument an instance of the Camera class. The mimetype argument is set as shown above, with the multipart/x-mixed-replace content type and a boundary set to the string "frame".

The gen() function enters a loop where it continuously returns frames from the camera as response chunks. The function asks the camera to provide a frame by calling the camera.get_frame() method, and then it yields with this frame formatted as a response chunk with a content type of image/jpeg, as shown above.

Obtaining Frames from a Video Camera

Now all that is left is to implement the Camera class, which will have to connect to the camera hardware and download live video frames from it. The nice thing about encapsulating the hardware dependent part of this application in a class is that this class can have different implementations for different people, but the rest of the application remains the same. You can think of this class as a device driver, which provides a uniform implementation regardless of the actual hardware device in use.

The other advantage of having the Camera class separated from the rest of the application is that it is easy to fool the application into thinking there is a camera when in reality there is not, since the camera class can be implemented to emulate a camera without real hardware. In fact, while I was working on this application, the easiest way for me to test the streaming was to do that and not have to worry about the hardware until I had everything else running. Below you can see the simple emulated camera implementation that I used:

from time import time

class Camera(object):
    def __init__(self):
        self.frames = [open(f + '.jpg', 'rb').read() for f in ['1', '2', '3']]

    def get_frame(self):
        return self.frames[int(time()) % 3]

This implementation reads three images from disk called 1.jpg2.jpg and 3.jpg and then returns them one after another repeatedly, at a rate of one frame per second. The get_frame() method uses the current time in seconds to determine which of the three frames to return at any given moment. Pretty simple, right?

To run this emulated camera I needed to create the three frames. Using gimp I've made the following images:

Frame 1 Frame 2 Frame 3

Because the camera is emulated, this application runs on any environment, so you can run this right now! I have this application all ready to go on GitHub. If you are familiar with git you can clone it with the following command:

$ git clone https://github.com/miguelgrinberg/flask-video-streaming.git

If you prefer to download it, then you can get a zip file here.

Once you have the application installed, create a virtual environment and install Flask in it. Then you can run the application as follows:

$ python app.py

After you start the application enter http://localhost:5000 in your web browser and you will see the emulated video stream playing the 1, 2 and 3 images over and over. Pretty cool, right?

Once I had everything working I fired up my Raspberry Pi with its camera module and implemented a new Camera class that converts the Pi into a video streaming server, using the picamera package to control the hardware. I will not discuss this camera implementation here, but you can find it in the source code in file camera_pi.py.

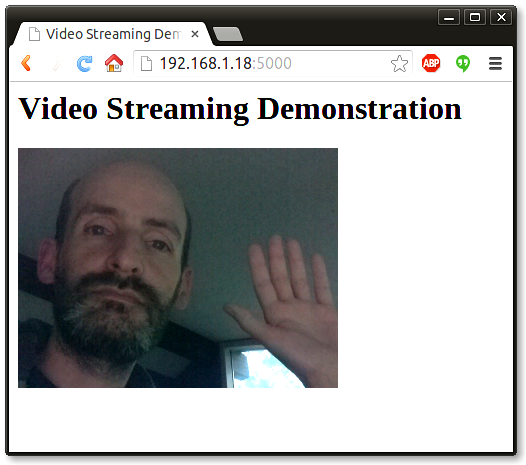
If you have a Raspberry Pi and a camera module you can edit app.py to import the Camera class from this module and then you will be able to live stream the Pi camera, like I'm doing in the following screenshot:

Frame 1

If you want to make this streaming application work with a different camera, then all you need to do is write another implementation of the Camera class. If you end up writing one I would appreciate it if you contribute it to my GitHub project.

Limitations of Streaming

When the Flask application serves regular requests the request cycle is short. The web worker receives the request, invokes the handler function and finally returns the response. Once the response is sent back to the client the worker is free and ready to take on another request.

When a request that uses streaming is received, the worker remains attached to the client for the duration of the stream. When working with long, never ending streams such as a video stream from a camera, a worker will stay locked to the client until the client disconnects. This effectively means that unless specific measures are taken, the application can only serve as many clients as there are web workers. When working with the Flask application in debug mode that means just one, so you will not be able to connect a second browser window to watch the stream from two places at the same time.

There are ways to overcome this important limitation. The best solution in my opinion is to use a coroutine based web server such as gevent, which Flask fully supports. With the use of coroutines gevent is able to handle multiple clients on a single worker thread, as gevent modifies the Python I/O functions to issue context switches as necessary.

Conclusion

In case you missed it above, the code that supports this article is this GitHub repository: https://github.com/miguelgrinberg/flask-video-streaming/tree/v1. Here you can find a generic implementation of video streaming that does not require a camera, and also an implementation for the Raspberry Pi camera module. This follow-up article describes some improvements I made after this article was published originally.

I hope this article shed some light on the topic of streaming. I concentrated on video streaming because that is an area I have some experience, but streaming has many more uses besides video. For example, this technique can be used to keep a connection between the client and the server alive for a long time, allowing the server to push new information the moment it becomes available. These days the Web Socket protocol is a more efficient way to achieve this, but Web Socket is fairly new and works only in modern browsers, while streaming will work on pretty much any browser you can think of.

If you have any questions feel free to write them below. I plan to continue documenting more of the not well known Flask topics, so I hope you connect with me in some way to know when more articles are published. I hope to see you in the next one!

Streaming Video in Android Apps

 The Android platform provides libraries you can use to stream media files, such as remote videos, presenting them for playback in your apps. In this tutorial, we will stream a video file, displaying it using the VideoView component together with a MediaController object to let the user control playback.

We will also briefly run through the process of presenting the video using the MediaPlayer class. If you've completed the series on creating a music player for Android, you could use what you learn in this tutorial to further enhance it. You should be able to complete this tutorial if you have developed at least a few Android apps already.

Premium Option

If you want a ready-made solution, check out YoVideo, an Android app template for creating a beautiful mobile video player for Android smartphone.

Users can view videos, follow and share with their friends on Facebook. Using this application template will save you money and time in creating a video-sharing application.

YoVideo on Envato Market
YoVideo on Envato Market

Or you could hire an Android developer to create a custom solution for you. Otherwise, read on for the instructions on how to do it yourself.

1. Create a New App

2 Million+ WordPress Themes & Plugins, Web & Email Templates, UI Kits and More

Download thousands of WordPress themes and plugins, web templates, UI elements, and much more with an Envato Elements membership. Get unlimited access to a growing library to millions of creative and code assets.

UX & UI Kits

Easily customizable UX and UI kits to inspire your next project.

iOS App Templates

2,500+ stunning iOS app templates for your next project.

App Design Templates

The perfect starting point for your next mobile app design.

Step 1

You can use the code in this tutorial to enhance an existing app you are working on or you can create a new app now in Eclipse or Android Studio. Create a new Android project, give it a name of your choice, configure the details, and give it an initial main Activity class and layout.

Step 2

Let's first configure the project's manifest for streaming media. Open the manifest file of your project and switch to XML editing in your IDE. For streaming media, you need internet access, so add the following permission inside the manifest element:

1
<uses-permission android:name="android.permission.INTERNET" />
Advertisement

2. Add VideoView

Step 1

The Android platform provides the VideoView class in which you can play video files. Let's add one to the main layout file:

01
02
03
04
05
06
07
08
09
10
11
12
13
14
15
16
17
18
<RelativeLayout xmlns:android="http://schemas.android.com/apk/res/android"
    xmlns:tools="http://schemas.android.com/tools"
    android:layout_width="match_parent"
    android:layout_height="match_parent"
    android:paddingBottom="@dimen/activity_vertical_margin"
    android:paddingLeft="@dimen/activity_horizontal_margin"
    android:paddingRight="@dimen/activity_horizontal_margin"
    android:paddingTop="@dimen/activity_vertical_margin"
    android:background="#000000"
    tools:context=".MainActivity" >
 
    <VideoView
        android:id="@+id/myVideo"
        android:layout_width="fill_parent"
        android:layout_height="fill_parent"
        android:layout_centerInParent="true" />
         
</RelativeLayout>

Alter the parent layout to suit your own app if necessary. We give the VideoView instance an id attribute so that we can refer to it later. You may need to adjust the other layout properties for your own design.

Step 2

Now let's retrieve a reference to the VideoView instance in code. Open your app's main Activity class and add the following additional imports:

1
2
3
import android.net.Uri;
import android.widget.MediaController;
import android.widget.VideoView;

Your Activity class should already contain the onCreate method in which the content view is set:

1
2
3
4
5
@Override
protected void onCreate(Bundle savedInstanceState) {
        super.onCreate(savedInstanceState);
        setContentView(R.layout.activity_main);
}

After the setContentView line, let's get a reference to the VideoView instance as follows, using the id we set in the XML layout:

1
VideoView vidView = (VideoView)findViewById(R.id.myVideo);
Advertisement

3. Stream a Video File

Step 1

Now we can stream a video file to the app. Prepare the URI for the endpoint as follows:

You will of course need to use the remote address for the video file you want to stream. The example here is a public domain video file hosted on the Internet Archive. We parse the address string as a URI so that we can pass it to the VideoView object:

1
vidView.setVideoURI(vidUri);

Now you can simply start playback:

1
vidView.start();

The Android operating system supports a range of video and media formats, with each device often supporting additional formats on top of this.

As you can see in the Developer Guide, video file formats supported include 3GP, MP4, WEBM, and MKV, depending on the format used and on which platform level the user has installed.

Audio file formats you can expect built-in support for include MP3, MID, OGG, and WAV. You can stream media on Android over RTSP, HTTP, and HTTPS (from Android 3.1).

4. Add Playback Controls

Step 1

We've implemented video playback, but the user will expect and be accustomed to having control over it. Again, the Android platform provides resources for handling this using familiar interaction via the MediaController class.

In your Activity class's onCreate method, before the line in which you call start on the VideoView, create an instance of the class:

1
MediaController vidControl = new MediaController(this);

Next, set it to use the VideoView instance as its anchor:

1
vidControl.setAnchorView(vidView);

And finally, set it as the media controller for the VideoView object:

1
vidView.setMediaController(vidControl);

When you run the app now, the user should be able to control playback of the streaming video, including fast forward and rewind buttons, a play/pause button, and a seek bar control.

The seek bar control is accompanied by the length of the media file on the right and the current playback position on the left. As well as being able to tap along the seek bar to jump to a position in the file, the streaming status is indicated using the same type of display the user will be accustomed to from sites and apps like YouTube.

As you will see when you run the app, the default behavior is for the controls to disappear after a few moments, reappearing when the user touches the screen. You can configure the behavior of the MediaController object in various ways. See the series on creating a music player app for Android for an example of how to do this. You can also enhance media playback by implementing various listeners to configure your app's behavior.

5. Using MediaPlayer

Step 1

Before we finish, let's run through an alternative approach for streaming video using the MediaPlayer class, since we used it in the series on creating a music player. You can stream media, including video, to a MediaPlayer object using a surface view. For example, you could use the following layout:

01
02
03
04
05
06
07
08
09
10
11
12
13
14
15
16
17
<RelativeLayout xmlns:android="http://schemas.android.com/apk/res/android"
    xmlns:tools="http://schemas.android.com/tools"
    android:layout_width="match_parent"
    android:layout_height="match_parent"
    android:background="#000000"
    android:paddingBottom="@dimen/activity_vertical_margin"
    android:paddingLeft="@dimen/activity_horizontal_margin"
    android:paddingRight="@dimen/activity_horizontal_margin"
    android:paddingTop="@dimen/activity_vertical_margin"
    tools:context=".MainActivity" >
 
    <SurfaceView
        android:id="@+id/surfView"
        android:layout_width="fill_parent"
        android:layout_height="fill_parent" />
 
</RelativeLayout>

We will refer to the SurfaceView in the implementation of the Activity class.

Step 2

In your Activity class, add the following interfaces:

1
public class MainActivity extends Activity implements SurfaceHolder.Callback, OnPreparedListener

Your IDE should prompt you to add these unimplemented methods:

01
02
03
04
05
06
07
08
09
10
11
12
13
14
15
16
17
18
19
@Override
public void surfaceChanged(SurfaceHolder arg0, int arg1, int arg2, int arg3) {
    // TODO Auto-generated method stub
}
 
@Override
public void surfaceCreated(SurfaceHolder arg0) {
//setup
}
 
@Override
public void surfaceDestroyed(SurfaceHolder arg0) {
    // TODO Auto-generated method stub
}
 
@Override
public void onPrepared(MediaPlayer mp) {
//start playback
}

We will add to the surfaceCreated and onPrepared methods.

Step 3

To implement playback, add the following instance variables to the class:

1
2
3
4
private MediaPlayer mediaPlayer;
private SurfaceHolder vidHolder;
private SurfaceView vidSurface;

In the Activity's onCreate method, you can then start to instantiate these variables using the SurfaceView object you added to the layout:

1
2
3
vidSurface = (SurfaceView) findViewById(R.id.surfView);
vidHolder = vidSurface.getHolder();
vidHolder.addCallback(this);

Step 4

In the surfaceCreated method, set up your media playback resources:

01
02
03
04
05
06
07
08
09
10
11
try {
    mediaPlayer = new MediaPlayer();
    mediaPlayer.setDisplay(vidHolder);
    mediaPlayer.setDataSource(vidAddress);
    mediaPlayer.prepare();
    mediaPlayer.setOnPreparedListener(this);
    mediaPlayer.setAudioStreamType(AudioManager.STREAM_MUSIC);
}
catch(Exception e){
    e.printStackTrace();
}

Finally, in the onPrepared method, start playback:

1
mediaPlayer.start();

Your video should now play in the MediaPlayer instance when you run the app.

Conclusion

In this tutorial, we have outlined the basics of streaming video on Android using the VideoView and MediaPlayer classes. You could add lots of enhancements to the code we implemented here, for example, by building video or streaming media support into the music player app we created. You may also wish to check out associated resources for Android such as the YouTube Android Player API.

Technology’s generational moment with generative AI: A CIO and CTO guide

 Ref:  A CIO and CTO technology guide to generative AI | McKinsey 1. Determine the company’s posture for the adoption of generative AI As us...